
Deadwood is one of the most important concepts in Gin Rummy. It affects when you can knock, how scoring works, and how often you risk being undercut.
This guide explains what deadwood is, how to count it correctly, and how to reduce it, with clear examples for beginners.
Definition: What Does Deadwood Mean?
In Gin Rummy, deadwood refers to any card in your hand that is not part of a valid meld.
A meld is either:
- A set (three or four cards of the same rank), or
- A run (three or more consecutive cards of the same suit)
Any card not used in a meld counts as deadwood. Your deadwood total is the sum of all those cards’ values.
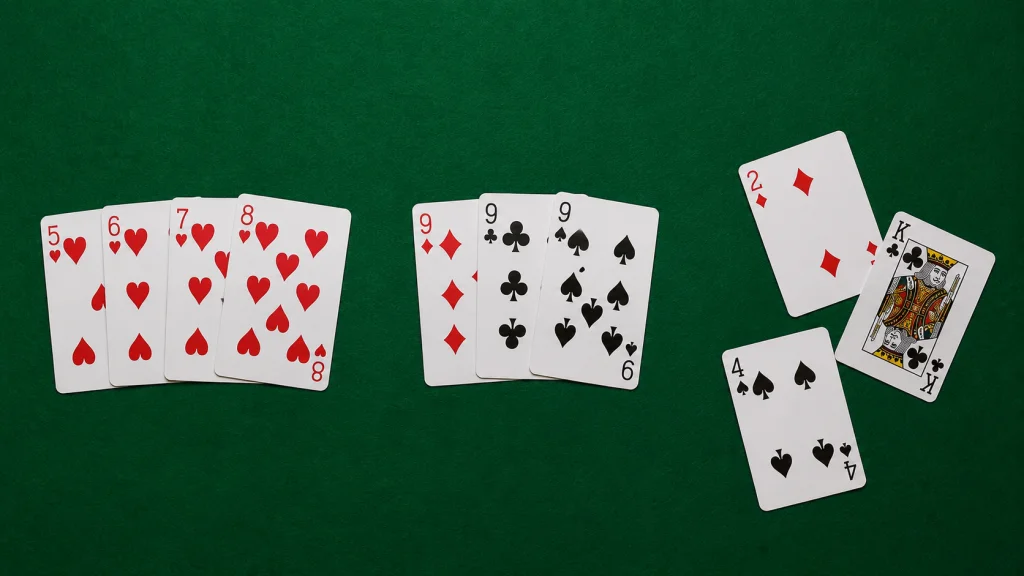
Card Values Used for Deadwood
Deadwood is counted using standard point values:
- Ace = 1 point
- Number cards = face value (a 7 = 7, a 10 = 10)
- Jack, Queen, King = 10 points each
These values matter only for deadwood scoring, not for forming melds. A King and a 2 have equal value when it comes to forming a set of Kings — but very different deadwood cost.
Deadwood Examples
Example 1: High deadwood, cannot knock
Your hand contains:
- Run: 4♣ 5♣ 6♣ 7♣
- Set: 9♠ 9♦ 9♥
- Unmatched cards: K♦, Q♠, 2♠
Deadwood:
- K♦ = 10
- Q♠ = 10
- 2♠ = 2
➡ Total deadwood = 22
Cannot knock — 22 is well above the 10-point limit. Priority: discard K♦ or Q♠ immediately.
Example 2: Borderline — risky to knock
Your hand contains:
- Run: 6♥ 7♥ 8♥ 9♥
- Set: J♠ J♦ J♣ J♥
- Unmatched cards: 6♦, 3♠
Deadwood:
- 6♦ = 6
- 3♠ = 3
➡ Total deadwood = 9
You may knock — 9 is within the limit. But this is a relatively high knock. Your opponent might have low deadwood or be able to lay off cards. Consider whether one more turn could drop you to 3 or 4.
Example 3: Safe knock
Your hand contains:
- Run: 6♥ 7♥ 8♥ 9♥ 10♥
- Set: Q♠ Q♦ Q♣ Q♥
- Unmatched cards: 3♦
Deadwood:
- 3♦ = 3
➡ Total deadwood = 3
Safe to knock. A 3-deadwood knock gives your opponent very little room to undercut you even with layoffs.
Example 4: Gin
Your hand contains:
- Run: 4♠ 5♠ 6♠ 7♠
- Set: K♥ K♦ K♣
- Run: A♣ 2♣ 3♣
Deadwood: none.
➡ Total deadwood = 0 — go gin
Why Deadwood Matters
Deadwood is the single most important number in your hand at any point in the game. It determines:
- Whether you can knock — you need 10 or less
- Who wins the round — lower deadwood after layoffs wins
- How many points are scored — the difference between deadwood totals
- Whether an undercut occurs — if your opponent’s deadwood equals or beats yours after layoffs
Lower deadwood means:
- You can knock sooner and more safely
- Your opponent needs a stronger hand or better layoffs to beat you
- Your scoring margin is larger and more reliable
Higher deadwood means:
- You are stuck drawing and discarding while your opponent improves
- You are exposed if your opponent knocks first
- Even a small knock win for your opponent costs you more
How to Count Deadwood Correctly
This is where beginners sometimes go wrong. The key rule: always find the arrangement of cards that gives you the lowest possible deadwood before counting.
A card might fit into more than one potential meld. Try all possible combinations and use the one that minimises your unmatched total.
Example: Finding the optimal arrangement
Your hand: 7♠ 7♦ 7♥ 5♠ 6♠ 7♣ J♦
Option A: Use 7♠ 7♦ 7♥ as a set, leaving 5♠ 6♠ 7♣ J♦ as deadwood = 5 + 6 + 7 + 10 = 28
Option B: Use 5♠ 6♠ 7♠ as a run and 7♦ 7♥ 7♣ as a set, leaving J♦ as deadwood = 10
Option B is dramatically better. Always check all arrangements before counting your deadwood.
Step-by-step deadwood counting
- Lay out your hand and identify all possible melds
- Try different combinations — a card might serve a set or a run
- Choose the arrangement that leaves the fewest unmatched cards
- Add up the values of all remaining unmatched cards
- That total is your deadwood
Deadwood vs Meld Quality
A common beginner mistake is focusing on building impressive melds while ignoring deadwood.
Example:
- Hand A: two complete melds (a set and a run), deadwood = 18 points
- Hand B: one complete meld, deadwood = 6 points
Hand B is in a stronger position. Hand A cannot knock yet and is vulnerable if the opponent knocks first.
In Gin Rummy, deadwood control matters more than hand appearance. A hand with three perfect melds but 15 deadwood is losing to a hand with one meld and 4 deadwood if the opponent knocks.
The question is never “how good are my melds?” It is always “what is my deadwood right now?”
How Deadwood Affects Knocking
You may knock only if your deadwood is 10 points or less.
But the limit is not the target — it is just the boundary. Knocking at exactly 10 is the riskiest legal knock. Think of deadwood bands:
| Deadwood | Knock safety |
|---|---|
| 0 | Go gin — safest possible |
| 1–4 | Very safe to knock |
| 5–7 | Generally safe, some risk |
| 8–10 | Risky — consider waiting |
The closer you are to 10, the more damage layoffs and undercuts can do.
👉 See also: When to Knock in Gin Rummy
How to Reduce Deadwood Effectively
Discard high-value cards early
Face cards (J, Q, K) cost 10 points each in deadwood. If a face card is not part of a meld by turn 3 or 4, discard it. Holding onto a King hoping it will join two others is expensive — three turns of 10-point deadwood while your opponent closes in.
Prioritise flexible cards
A 7 can form a set with other 7s or a run with 5-6 or 6-8 or 8-9. It works in multiple directions. A King can only go in a set of Kings or a K-Q-J run. Mid-range cards (5, 6, 7, 8, 9) are more flexible than high or low cards.
Avoid isolated cards with no backup
An isolated Q♠ with no other Queens and no J♠ K♠ nearby is a liability. If it doesn’t connect anywhere within two turns, discard it.
Build partial melds with clear paths
Holding 4♣ and 5♣ is reasonable — you are one card away from a run. Holding 4♣ and 8♣ is not a partial meld — they don’t connect. Don’t hold two cards together unless they genuinely work toward the same meld.
Lower deadwood first, improve structure second
When you have a choice between drawing to improve a meld or discarding to reduce deadwood, reducing deadwood is usually more important in the early turns. Get below 10 first, then refine from there.
Deadwood and Going Gin
When you go gin:
- All 10 cards are part of melds
- Deadwood = 0
- You score your opponent’s full deadwood
- You earn a gin bonus (usually 25 points)
- Your opponent cannot lay off any cards
Going gin is the strongest possible outcome — it eliminates all layoff risk and gives you the maximum scoring opportunity.
The trade-off is time. Going gin requires more turns than knocking. If your opponent knocks at 4 deadwood while you are waiting for gin with 2 deadwood, you lose the round. The decision between knocking now and waiting for gin is one of the central strategic questions in every hand.
Deadwood and Layoffs
After a knock:
- The opponent may lay off cards onto your melds
- Laid-off cards are subtracted from their deadwood
- Scoring is based on post-layoff deadwood totals
This means your opponent’s effective deadwood might be lower than it appears before the reveal.
Example: You knock with 6 deadwood. Your meld includes 5♠ 6♠ 7♠. Your opponent has 4♠ in their deadwood — they lay it off: 4♠ 5♠ 6♠ 7♠. Their deadwood drops by 4 points.
If their remaining deadwood after all layoffs is 6 or less — you get undercut.
This is why the apparent deadwood advantage when you decide to knock is not the same as the real advantage after layoffs. Always look at your melds and ask: what could my opponent add here?
👉 Related guide: Layoffs in Gin Rummy Explained
Common Deadwood Mistakes
Forgetting that face cards are worth 10 points
Beginners sometimes undercount deadwood by treating a Jack as its rank (11) or forgetting it is 10. Jacks, Queens, and Kings are all exactly 10.
Not finding the optimal meld arrangement
Counting deadwood with a suboptimal meld arrangement means you may think you cannot knock when you actually can — or you miscalculate your margin of safety.
Knocking without recounting
After drawing and discarding, always recount your deadwood. Do not rely on a count from a turn ago — it may have changed.
Ignoring layoffs when estimating your opponent’s deadwood
Your opponent’s pre-layoff deadwood is not the number that matters. Their post-layoff total is. Look at your melds and estimate what they might be able to add before deciding whether your deadwood advantage is safe.
Holding partial melds that never connect
Two cards that do not form a realistic partial meld are just deadwood. Holding J♠ and 4♦ together for three turns because you vaguely hope they will both connect to something is costing you each round.
Always re-count deadwood before ending a round.
Quick Deadwood Checklist
Before knocking or deciding whether to draw:
- Which cards in my hand are not in a meld?
- Have I tried all possible meld arrangements to find the lowest deadwood?
- What is my exact deadwood total?
- Can I reduce it further in one more turn?
- After likely layoffs, is my deadwood advantage safe?
Accurate deadwood counting prevents costly mistakes and makes every other decision in the game clearer.